
Bring the Deliciousness of Zahav’s Hummus Home
I’m originally from Philadelphia, and whenever I’m back visiting family and friends, I always plan a dinner at Zahav, chef Michael Solomonov’s incredible Israeli restaurant. Think fine dining but in a relaxed setting that makes you feel at home, albeit a home with mind-blowingly good food (including the best hummus you’ve ever eaten) and service that’s warm and welcoming and pretty darn close to perfect.
Of course, not everybody is in a position to pop over to Philadelphia (if you do, I’d recommend reserving at least two weeks in advance). But we’re all in luck: Mike Solomonov, with his fellow Zahav owner Steven Cook, created a cookbook: Zahav: A World of Israeli Cooking, and it’s awesome. In fact, it’s so awesome that it won this year’s James Beard Book of the Year and Best International Cookbook. In it are tons of Zahav restaurant recipes, and great insights into why Mike cooks what he does. It’s truly an outstanding read.
I’ve tried making several dishes from the Zahav cookbook, and like any cookbook, there’s always a little trial and error to adapt it to your own tastes and kitchen. I’ve made tabouli (I won’t skimp on the parsley next time, and I’ll get my mise en place fully done before I combine ingredients), beet tehina (nailed it twice!) and the one I’m going to talk to you about today: hummus.
Hummus is universally beloved, because it’s so healthy and versatile. You can get it at the supermarket in tons of different “flavors,” and admittedly different countries in the Middle East/Mediterranean region (which admittedly I haven’t visited) have their own styles, but the hummus at Zahav is hands down the best I’ve had. A few important things as we get started:
Israeli hummus is based on Tehina, the Israel mother sauce. And that starts with tahini, the sesame paste that often comes (I never knew this before) from Ethiopia. You can find many brands of tahini at the supermarket, including a bunch of organics, but the one I use is the one Zahav uses: Soom. (You can buy it on Amazon!) Yes, sometimes it’s written as tehina as well, but we’ll call Tehina the finished sauce and tahini the original sesame paste to help keep them straight.
You can use canned garbonzo beans if you like, but I’ve tried going more traditional (and better quality). Mine are from Koda Farms, which is legendary in California farmers’ market circles for their rice–and they grow organic garbonzos too! Yes, it takes a little while longer (since unlike canned garbonzos, you need to rehydrate them and cook them), but it’s well worth it. You can make the tehina while the garbonzos are on the stove, so the whole thing isn’t really that time-consuming.
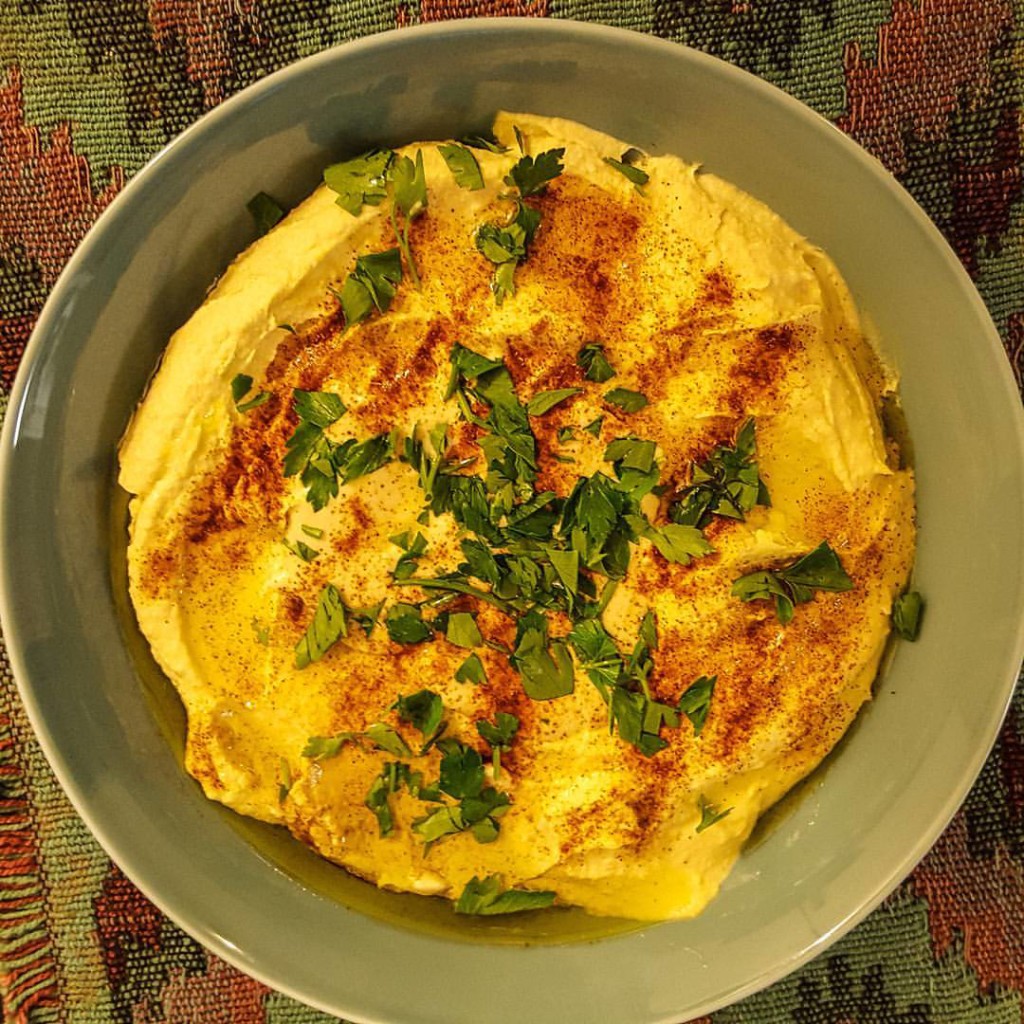
The serving bowl makes a difference. Go for a bowl that is wider and shallow, so that you can spread the hummus out and it has better access to the olive oil, parsley and paprika you’ll spread on top of it. My first time was in a deep bowl, and it just didn’t work as well.
So…let’s get started. If you’re using dried garbonzos, you’ll want them to soak in a bowl overnight, with enough water to cover them by several inches. Chef suggests adding baking powder, as it helps break down the beans. Do it. I just cover them with some wax paper, set ’em and forget ’em. On my two attempts, I’ve made half the recipe, which in this case means 1/2 cup of dried garbonzos and 1/2 teaspoon of baking powder.
Flash forward to the next morning. Drain and rinse the now rehydrated garbonzos, and then throw them into a large pot on the stove. Cover them with water–about four inches–and add another 1/2 teaspoon of baking powder. Bring the garbonzos to a boil. If there’s any garbonzo “scum,” you can skim it off. Once they hit that boil, lower the heat so that it’s simmering and cover it. Chef suggests about an hour of simmering, and then maybe a little more. That worked well for me. The beans were nice and tender. At that point you’ll drain and rinse them again.
Of course, while that’s going on, you’re making Tehina, the Israeli mother sauce. Again, I’m making half the recipe. You’ll start by separating the cloves from half a head of garlic and throwing them, unpeeled, into a blender (what Chef suggests) or a food processor (which has worked just fine for me) with 3/8 cup of lemon juice. Personally, I love meyer lemons, which are lemon-orange hybrids, so that’s what I use whenever lemon juice is called for. Run the food processor for a few seconds to mash things up pretty well into a paste. At this point, Chef tells us something that makes complete sense but that I wouldn’t have figured out on my own: let the garlic/lemon juice mash hang out for about ten minutes, so that the lemon juice mellows out the garlic. (Lemon is an acid, so it’s “cooking” the garlic.) At that point, you’ll dump the whole mixture into a sieve over a bowl. You want to press the solids (the garlic mash that has absorbed a lot of lemon juice) hard, so that you get every bit of liquid into the bowl. I use the back of a spoon.
Next, you’ll add a cup of the Soom (or whatever) tahini into the bowl, along with 3/4 teaspoon salt and 1/4 teaspoon cumin. The tahini is going to thicken things…fast. So have a large glass of cold water standing by, and you’re going to start adding it a little (a couple tablespoons) of the water at a time. I don’t actually measure my tablespoons of water, but rather just dump a little at a time. While you’re doing this, you’ll be stirring with a whisk (no blenders or food processors at this point). The color will lighten as you add water, and it will thin to the point where it’s smooth and creamy, but neither liquidy nor like concrete. Taste it. If necessary, add a little more salt and cumin. My first time doing this, I didn’t add more (I didn’t realize I could) of the seasonings, but the second time, I added a little bit more of both (maybe a quarter teaspoon)–keep tasting it–and it made a huge difference for the better.
If you’re using the Tehina Sauce right away, you can just let it hang out, or if you are using it another time, you can throw it in a jar and refrigerate it, as per Chef, for up to a week. I’ve done both. If it’s going to be refrigerated, you might want to add a little extra water to keep it from seizing up in the refrigerator (which tends to do that to things).
Back to the chickpeas. You’ve cooked them, drained them and rinsed them. Now you’ll throw them into the food processor along with the 3/4 cup of the Tehina sauce, 1/8 teaspoon of cumin and 1/2 teaspoon of salt. Run that baby until you’ve got a smooth mixture. If you want your hummus chunky, you could stop sooner, but I recommend the smoother texture. Almost done!
Plate your hummus mix into a serving bowl (again, wide and shallow>slim and deep). At this point, you can add some of the remaining Tehina sauce if you like. Dust it with paprika, drizzle with your favorite olive oil and then sprinkle chopped fresh parsley over top. Time to eat. While nothing beats the hummus at Zahav, the cookbook version is the next best thing until I can get back to Philadelphia.
Tehina Sauce
3/8 cup lemon juice
1/2 head garlic
3/4 teaspoon salt
1/4 teaspoon ground cumin
1 cup tahini (Soom or the brand of your choice)
cold water as needed
Hummus
1/2 dried garbonzo beans
3/4 cup Tehina sauce
1/8 teaspoon ground cumin
1/2 teaspoon salt
Parsley, for garnish
Paprika, for garnish
Olive oil, for garnish
Zahav
237 St. James Place
Philadelphia, PA 19106
Want all hummus all the time? Michael Solomonov and Steven Cook also operate Dizengoff, a hummusiya, in its original location in Philadelphia (1625 Sansom Street) as well as at New York’s Chelsea Market (75 9th Avenue). Just go early in the day before they sell out!